 |
||
| How to paint 1st Battalion of Gerona´s royal flag. Peninsular War. |
|
|---|---|
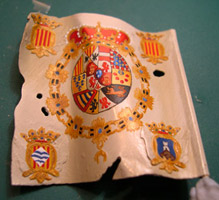
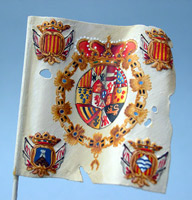
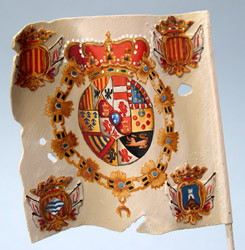
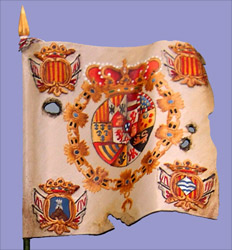
Certainly, a good flag always gives a spectacular touch to a diorama. In the case of the Battle of Alba de Tormes. 1809 diorama which is produced by NIMIX- there were several options to choose, in particular the Regiment's flag (with St. Andrew's cross) or the Battalion's royal flag. I chose this second option, despite the difficulty in painting it, due to the fact of its unquestionably spectacular final result. The first step of all was to obtain some information about 1 st Battalion of Gerona's royal flag, which can be found in the Spanish Army Museum 's flag catalogue, written by Luis Sorando. I personally ask for the author's advice indeed. In this catalogue one can find the flag well detailed and some useful information about the four coats of arms placed in the corners.
|
|
 |
|
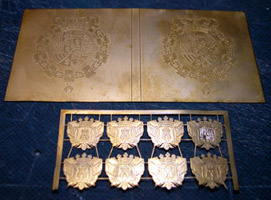
The etched brass will provide us a very important relief, because printing motifs in flags is a very recent technique in modern History all over the World. Nowadays the significant flags are still embroidered. To embroider flags by hand is a way of dignifying them (and also let me remind you the embroiderers' tough work). That is why a little relief gives a realist touch to our work. And it goes without saying that etched brass will make our work easier, more accurate and symmetric. |
|
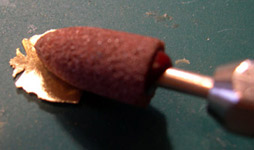
The inside embossing that you will find in NIMIX's coats of arms are not necessary here ( they have been made for other regiments) so you will sand the interior in order to erase this embossing and leave it smooth. You will use a small power drill which will help a lot- or, if not possible, just use a hard, metal file. |
|
 |
|
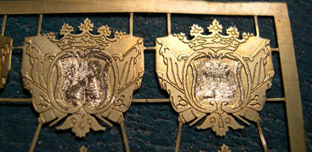
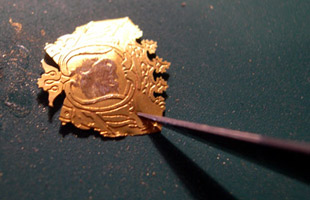
Once the inside of the coats of arms are sanded you will lighten them. |
|
|
Just reduce their thickness with a small power drill or a file.
|
 |
 |
|
Then you may prepare the flag as it is written in the article How to work on an etched brass flag, that you can find in NIMIX´s website. |
|
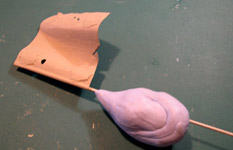
You will stick the coats of arms on their position and, as the intention is to represent a battle here, let's wear out the flag a little bit, just to give more realism and a colourful atmosphere to the diorama. Use a pair of scissors to cut the edges of the flag in order to simulate tears and wears. Then, make some little holes to simulate the shootings that have hit the flag. |
|
|
In this occasion, the royal flag needs a lot of painting work in the central area, so wave it here widely and leave the serious effects of the wind for the corners or the side edges. This will be highly useful when painting and the outcome will be more attractive. Once the coats of arms are stuck on the corners, the flag will be ready to be painted. Add some foundation paint, so it will help you to fill any hole between the coat of arms and the flag, and also it will serve as a base coat. |
|
 |
|
Firstly you have to shade and highlight the flag. Prepare a good quantity of paint. In this case, the flag will be part of a diorama, so in will be better to choose a white shade very similar to the trousers of the figures. The colour perspective will match better if you do so. The base colour mixture is composed of: light grey with some brown khaki and golden brown, which will create a dirty white. The lights will be made with white and the shadows with brown khaki. If you can use an air brush, but you can also use a brush-as I actually did. Just follow he waves you have done before shading and highlighting. Once this stage finished, you can start with the details of the flag. Here is when the tough work begins |
|
The key to paint a perfect flag is to organize your work by areas. I usually do it as follows:
What regards to the lights and shadows, you will need to follow the scheme of lights created with the base painting of the flag. Nevertheless, be flexible, because if not, you will make wide areas in the central coat of arms full of shadows or lights. Then, try to make lights and shadows in every division even if you think it is not real. Thus, in case you find a quarter completely covered by shadows, add some lights to bring it out, but not as marked as the red divisions, which are placed in the light areas. Then do the same with the shadows. |
|
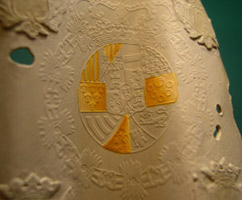
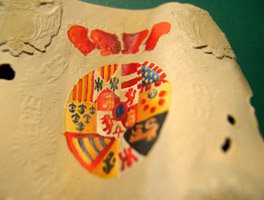
These are some pictures of the painting stages of the central coat of arms. (real size is 2.5-3 cm) |
|
 |
 |
 |
|
 |
 |
|
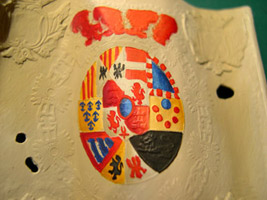
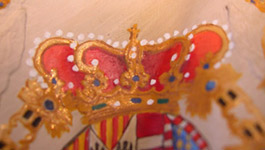
Once the central coat of arms finished you can outline it softly. The divisions will stand out and a neatly aspect will be given to the set. I realize that many modellers don't agree with outlining but, in this particular case I think it is essential in order to give a neat aspect to our flag. Besides, real flags have this outline between divisions, made of black or golden thread. I prefer a dark outlining, with red brown and black areas mixed, depending on the divions and their colours. This picture shows an advanced moment of the painting. |
|
 |
|
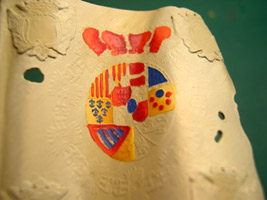
Once the central coat of arms finished, let's begin the next stage. Do at the same time all elements that need golden colour: the crown, the Golden Fleece and the small coats of arms. If you paint them at the same time the tones will be the same and you will keep the balance.Then, add Vallejo´s very thinned gold colour. You will shade the resultant brightness of this painting with some shadows. In this case, leave the outlining for the end. |
|
 |
|
And now, go for the tiny details included in the flag:
|
|
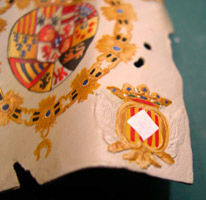
The main work is already done. Now paint the inside of the coats of arms in the corners. Three of them the two in the top corners and the one in the lower corner far from the flagpole- have the same background. Let's tackle them first. |
|
Paint the background in yellow and then four vertical stripes in red-that is Aragon 's coat of arms. To obtain a straight vertical line, draw a thin line first to situate all four proportionally and then make them thicker up to their real dimension. Do not worry about the shadows, you will come back later. |
|
 |
|
In the lower coat of arms of those three, paint on Aragon 's stripes a white rhombus, and then three parallel, symmetric, blue waves. |
|
 |
|
Finally you have left the fourth coat of arms. Paint a blue base, a brown mountain and a greyish castle, which will be shaded to simulate the gate and some embrasures. Its real size cannot be larger than 1cm. |
|
 |
|
Now it is time for the details of the lateral sides of the coats of arms: lances and their details in red. |
|
The flag is almost finished. |
|
 |
 |
 |
|
However it lacks some strength yet. You can now put into practice the techniques of plane figures. First add some general shadows in order to incorporate all lights and shadows. To do so add some very thinned red brown with your brush, little by little, and shade the whole gold chain, the crown and the side coats of arms. It is a very simple technique, the painting needs to be very thinned, the brushstrokes very shorts and push the painting towards the darkest areas. Then you will outline the crown, chain and side coats of arms with this painting. Use the same technique to give some touches to the main coat of arms and the inside of the little ones . Use black colour if some areas are darker than red brown. |
|
 |
 |
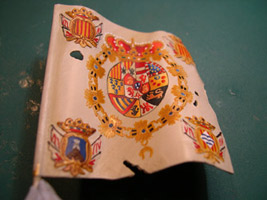
This will be a flag which is well worth the effort. |
|
At first glimpse you may consider that this is over. But as you are about to include the flag in a diorama, you will need to soil and to wear it out. So, in this case, use some oil washes, more appropriate for this kind of work, with so wide areas (acrylics would leave rings and lose the flag's looks). Use different tones of brown and black colour at the end to give the final real touch. The bullet holes will be highlighted with black, simulating the gunpowder burns. |
|
 |
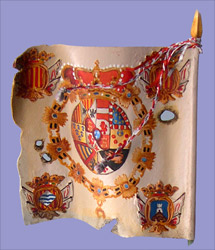 |
And now, it seems the work is over. |
|
NIMIX. APARTADO DE CORREOS 45.117. MADRID 28080. (SPAIN)
TEL/FAX: 00-34-91 352 81 39